How availability on Camelo works
Availability on Camelo is your preference regarding when you’re available and unavailable for work. By default, you’re set to be available all day.
By setting your availability, you let the scheduler know when you prefer to work and when you prefer not to work.
Notes
- You can turn on or off the Availability feature in Settings. If Availability is enabled, your team members can add their availability preferences.
- Setting your availability is letting your employer know about your preference only. Management can schedule shifts that don’t align with your availability.
- Users with Owner and Schedule Manager roles can set availability for users with Employee roles.
Turn on Availability feature
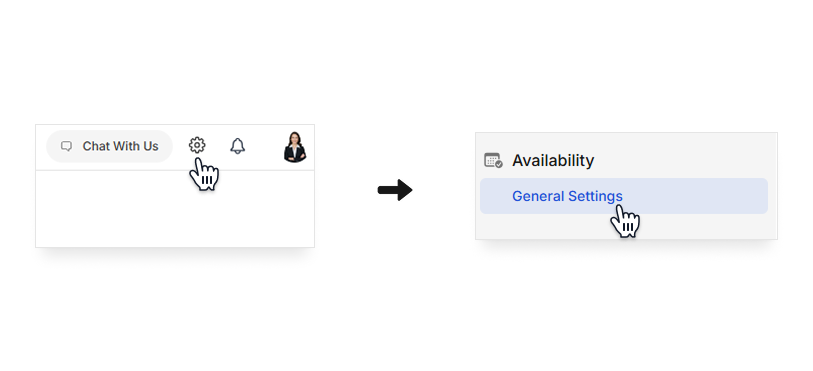
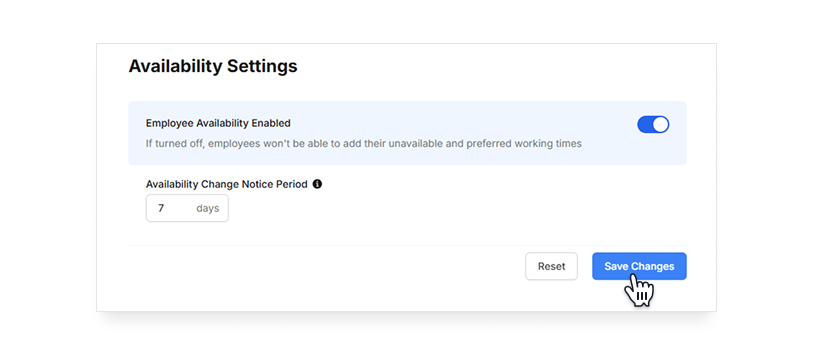
On the Camelo web app, click the in the top-right corner to go to Settings. Under Availability section, click General Settings. Toggle on Employee Availability to turn the feature on.
Set up the availability change notice period
The availability change notice period helps you plan schedules more reliably by limiting how close to a shift employees can update their availability. It means employees can only update availability a set number of days in advance.
By setting a minimum notice period, you reduce last-minute changes and gain more confidence when building schedules.
📌 You can only set the availability change notice period when you enable employee availability.
- Click the in the top-right corner of the page to go to Settings.
- Under the Availability section, click General Settings.

- Set the minimum number of days’ notice required for availability changes.
- Click Save Changes when you’re done.

This feature is currently only available on the Camelo web app.
This feature is currently only available on the Camelo web app.
Add your availability
- In the left navigation bar, click Home.
- Scroll to My Calendar section at the end of the page.
- Click Availability.

- Hover over the date you want to add your availability, click + Add.

- Select I prefer to work to add a time when you’re available, or I’m unavailable to work to add a time when you’re unavailable.

- Set the hours of your available/unavailable time.
- If you toggle All Day on, you’re available/unavailable the entire day.
- If you toggle All Day off, you can set the start time and end time of your availability. You can click a Suggested Time block to quickly fill in the time.
- Set how you want your availability preference to repeat.
- Customize whether to repeat the availability Every Day, Every 2 Weeks, or Every Month, etc.
- Choose when to end the repeat: Does not end, Ends on a date, or After repeated a specific number of times.
- Add a note regarding your availability. This note is optional and is visible to you and your employer.
- Click Save to save your availability preference.
- Open the Camelo app and select your profile picture in the top-left corner, then select My Availability.
- Select the date and the + icon to add the time you’re available/unavailable for work.
- Select I prefer to work to add a time when you’re available, or I’m unavailable to work to add a time when you’re unavailable.
- Set the hours of your available/unavailable time.
- If you toggle All Day on, you’re available/unavailable the entire day.
- If you toggle All Day off, you can set the start time and end time of your availability. You can tap a suggested time block below to quickly fill in the time.
- Set how you want your availability preference to repeat.
- Does not repeat: The availability will not repeat.
- Choose the repeat frequency: Every day, week, month, or year.
- Choose when to end the repeat: Does not end, Ends on a date, or After repeated a specific number of times.
- Add a note regarding your availability. This note is optional and is visible to you and your employer.
- Hit Save to save your availability preference.
📌 You can also access My Availability by going to the Menu tab at the bottom navigation bar and scrolling to the SCHEDULER section.
Edit your availability preference
- In the left navigation bar, click Home.
- Scroll to My Calendar section at the end of the page.
- Click Availability.
- Click the availability preference you want to edit.
- Click the to edit.
- Make changes, then click Save.
- If the preference repeats, you’ll be given options to update your recurring preferences:
- To update only the preference you’re selecting, choose Only this preference.
- To update this and future preferences, select This and future preferences.
- If you want to update all preferences, select All preferences.
- Select your profile picture in the top-left corner, then select My Availability.
- Select the date you want to edit your availability.
- Choose the availability preference you want to edit.
- Tap the ••• icon in the top right corner and select Edit Preference.
- Make the necessary changes, and then tap Save.
- If the preference repeats, you’ll be given options to update your recurring preferences:
- If you want to update this and future preferences, select This and future preferences.
- If you want to update all preferences, select All preferences.
Delete your availability preference
- In the left navigation bar, click Home.
- Scroll to My Calendar section at the end of the page.
- Click Availability.
- Click the availability preference you want to delete.
- Click the icon.
- If the preference repeats, you’ll be given options to delete your recurring preferences:
- To delete only the preference you’re selecting, choose Only this preference.
- To delete this and future preferences, select This and future preferences.
- If you want to delete all preferences, select All preferences.
- A confirmation box will appear, click Yes to delete.
- Select your profile picture in the top-left corner, then select My Availability.
- Select the date you want to delete your availability.
- Choose the availability preference you want to delete.
- Tap the ••• icon in the top right corner and select Delete Preference.
- If the preference repeats, you’ll be given options to delete your recurring preferences:
- To delete this preference only, select Only this preference.
- To delete this and future preferences, select This and future preferences.
- To delete all preferences, select All preferences.


