Navigate the Scheduler on web app
The Scheduler on Camelo is where you create, edit, and manage the schedule of your business.
To access the Scheduler on web, visit https://dashboard.camelohq.com, go to the left navigation bar, and click Scheduler.

Toolbar

This is where you can manage schedule settings and how you view the schedule.
Schedule settings

Click the drop down menu to edit the info of the selected schedule, add/remove employees, manage shift templates, export/print the schedule, or sync the schedule with your calendar apps.
Customize schedule view

Click the dropdown menu to customize the display of your schedule and shift blocks.
Views
Scheduler views let you view your workplace schedule in different ways and build schedules easier.
- Default: Switch between different schedules.
- Employees: List of employees of the schedule.
- Time Period: Click the drop down menu to choose to view the schedule by day, week, or month.
- Date Picker: Change the time period you want to view the schedule:
- Click < to go back to the previous day, week, or month.
- Click > to go to the next day, week, month.
- Click to choose a specific time.
- Zoom/Full Screen: Click to zoom in and out of the schedule, or view the schedule in full screen.
You can view the schedule by employee, position, coverage, and calendar. Click the View drop down menu to choose different view options:
- Select Employee if you want to build the schedule based on who will work.
- Select Position if you want to create the schedule based on positions in your workplace.
- Select Coverage if you want to create the schedule based on the chronological order of the shifts.
- Select Calendar if you want to create the schedule for the whole month.
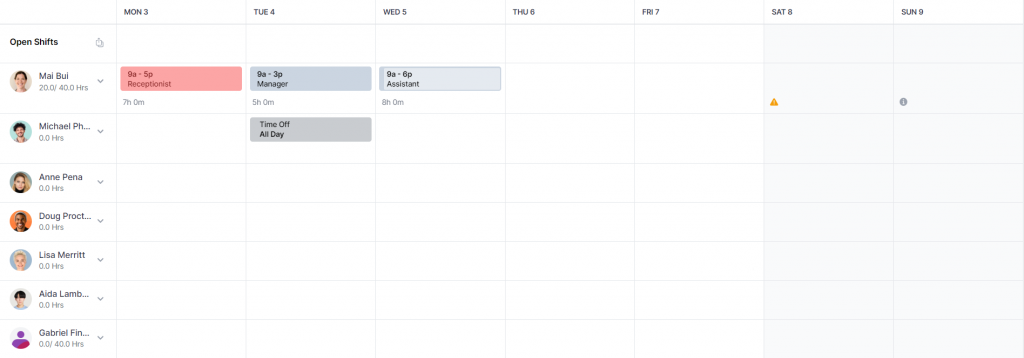
The schedule

- Open shifts: Shifts awaiting employees to claim.
- Draft shifts: Shifts that have not been published and are not visible to employees. They have lighter colors and darker borders. Draft shifts are only visible to users with the Owner and Schedule Manager role.
- Published shifts: Shifts that have been published and are visible to employees. They have solid colors.
- Time off: The employee takes time off.
- Availability: The hours the employee prefers to work.
- Unavailability: The hours the employee prefers not to work.
Adding shifts
Click the button on any cell in the schedule to add a shift. When you click, you can choose to use a shift template or create a custom shift.
You need to add a shift template to use a shift template. It’s helpful if you schedule shifts that frequently repeat.
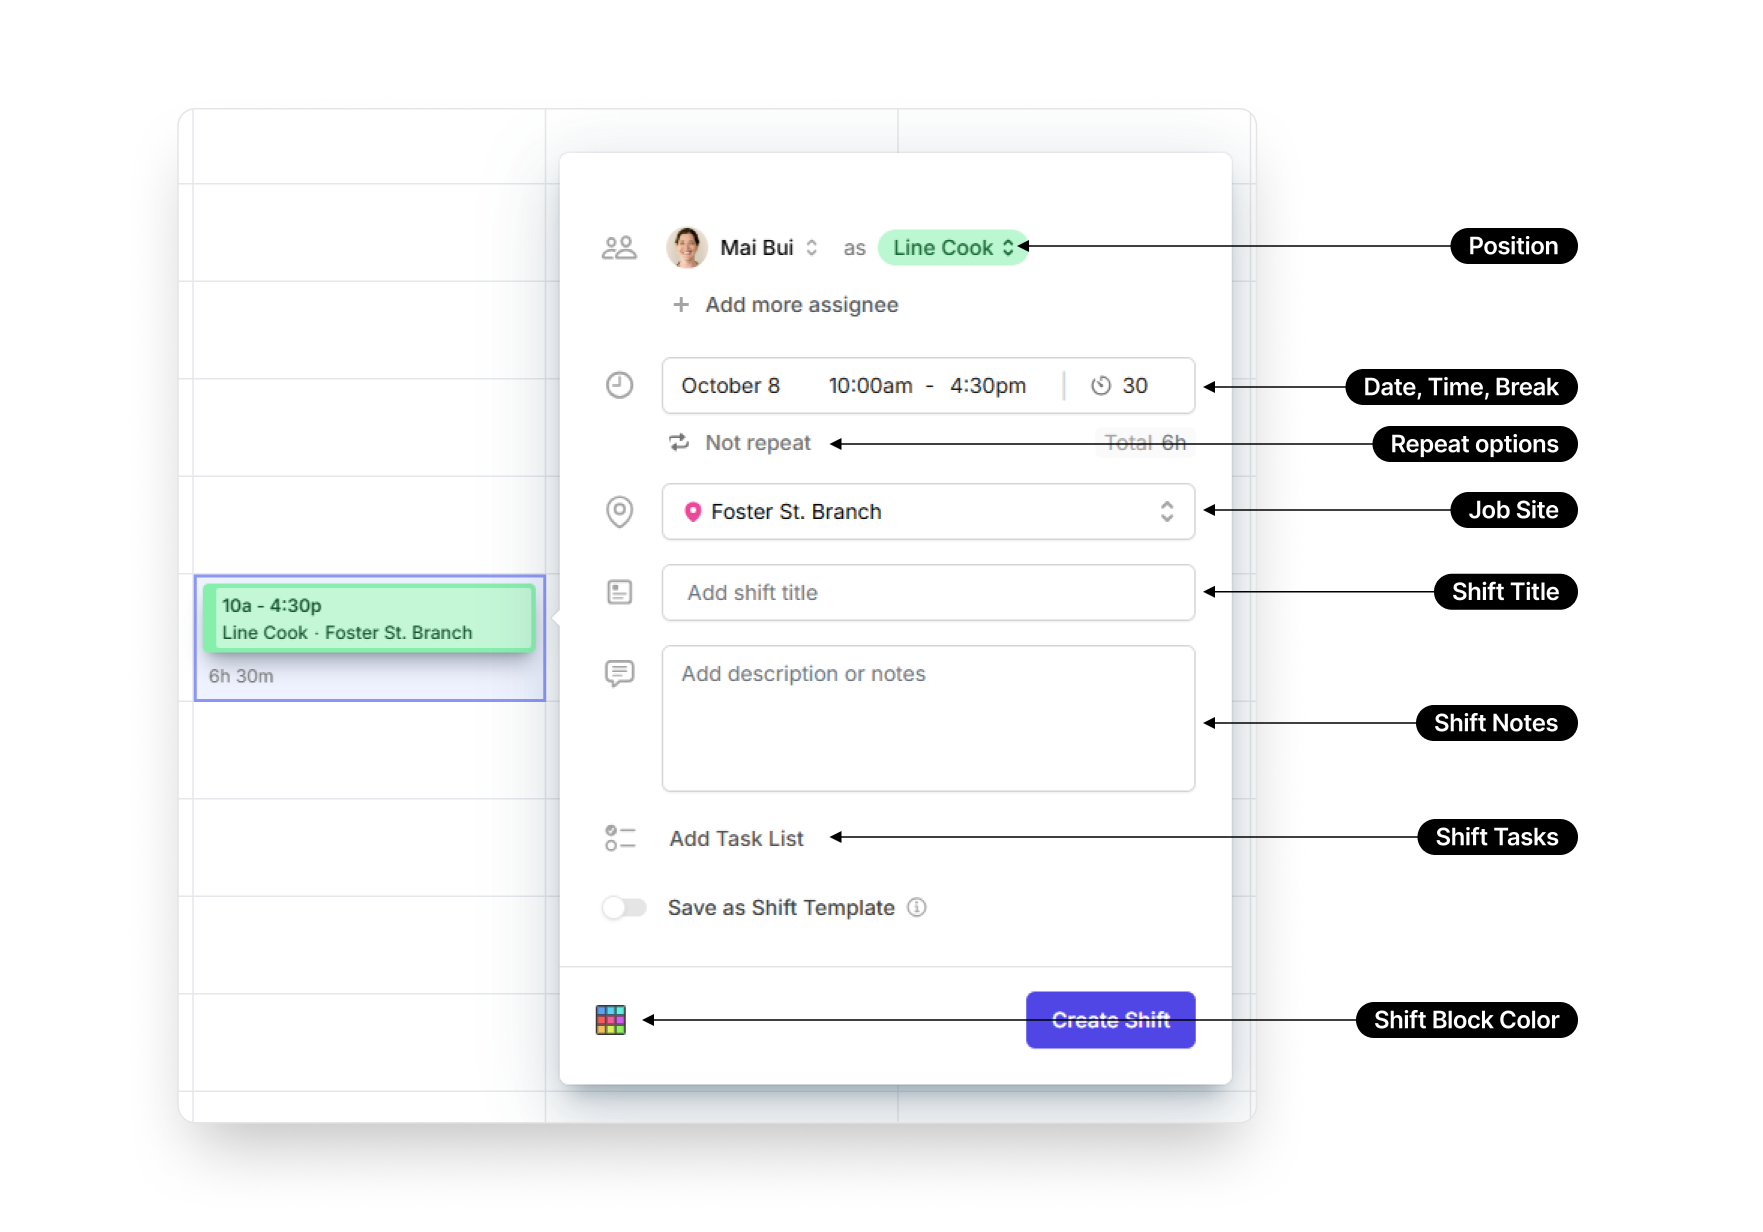
Shift details

- Assignee: The employee who will be working the shift.
- Position: The position the employee will work for the shift, such as server or barista.
- Start Time: When the shift starts.
- End Time: When the shift ends.
- Unpaid Break: The length of the unpaid break within the shift.
- Repeat: Options for repeating the shift.
- Job Site: The place where the shift takes place. It can be on-site or off-site, depending on your business.
- Shift Title: The title of the shift.
- Notes: Notes for the assignee.
- Attachments: Upload files to attach them to the shift.
- Task List: A list of tasks for that shift.
- Save as Shift Template: Click to save this shift as a template.
- Color: The color of the shift.
Publishing shifts
Employees can’t see shifts until you publish the schedule. When you finish adding shifts, click Publish in the top-right corner of the Scheduler to publish the schedule.
Learn more about options for publishing shifts.
Employee options

- Number/Number Hrs: The scheduled hours and maximum hours of the employee.
- Scheduled Hours: The number of hours the employee is currently scheduled to work.
- Maximum Hours: The maximum number of hours the employee should be scheduled to work in a week. You can set this in the employee’s settings.
- Publish [Employee]‘s Shifts: Click to publish all shifts of the employee.
- View [Employee]‘s Details: Click to view and edit the employee’s details.
- View [Employee]‘s Availability: Click to view the employee’s availability.


